Airtable – Tab Set Up for Case Analysis

Airtable, previously reviewed and discussed here, makes a great online replacement for Casemap. After that last post, there have been several requests from folks for a screenshot of what tabs work well for conducting legal case analysis using Airtable. So, without further ado:Airtable Tabs Case Analysis

All of the tabs have Airtable Linked Fields for cross referencing information. For example, the facts view has a linked to the Jury Instructions table. By linking facts to individual jury instructions, you can get a quick summary of all facts supporting or opposing the particular legal issue. The great thing about Airtable is the flexibility. You’re not locked into somebody’s predetermined ideal about what case analysis should like for you. The flexibility/customization can be a bit daunting (a bit like looking at a blank page when you need to first start writing a brief). But, after playing around with Airtable for a bit, you can really begin to leverage this flexibility, get creative and start to make connections in your case. Also, it’s great for working with other team members or getting someone new to the case up to speed quickly. Really, the only beef I have with Airtable at this point is the lack of off-line accessibility.

Circus Ponies – Export to Outline, OneNote

The demise of Circus Ponies Notebook left many lawyers with a lot of information stuck in a soon-to-be obsolete app. However, the indie developer for an app called Outline has created a method for exporting and, then, importing your Circus Ponies Notebooks into Outline. Standing alone, Outline is a good alternative to Notebook, albeit missing some of the features. Once imported into Outline, you can use the Outline apps on your iPad and Mac to sync back-and-forth. Conveniently, Outline also works and syncs directly with Microsoft OneNote. The sync process is a bit clunky and weird. But, if you have critical information and outlines stuck in Circus Ponies Notebook, Outline is the best way to free that information. Also, right now, if you buy directly from Outline (as opposed to the Apple Store), you’ll get 30% off the purchase price.

Airtable for Case Analysis – Casemap Replacement

Slice n Dice Your Case Data

In cases with a multitude of witnesses, facts, and things spread over a timeline and various documents and sources, getting a big picture view becomes essential. On the Windows platform, most lawyers turn to Casemap to pull together meaningful chronologies with the ability to slice and dice by issues, people and source. Casemap provides a ‘spreadsheet’ view for each major list of stuff: people, documents, issues etc. Casemap also made it a breeze to filter each sheet down to just the info you wanted to see or share. For example, filtering all Facts in a chronology down to witness “Joe Smith” and Issue “liability.” Casemap was mostly spreadsheet, but like a weird cross breed with a database. In short, it was a great place to capture data about your case as it evolved and then analyze that data down the road when preparing for a deposition, hearing or trial. On the Mac side, there hasn’t been a really solid tool for doing the same thing until recently.

In the cloud alternatives.

Current pay-to-play services like FactBox ($38/month) and CaseFleet ($34/month) offer close approximations of Casemap through cloud based interfaces. A trial run of FactBox did not coax any money from my wallet as the interface and input of facts carried too much friction and fussing. CaseFleet came not too long after but, in the interim, a cloud based offering called Airtable appeared.

More function, more flexibility, less friction.

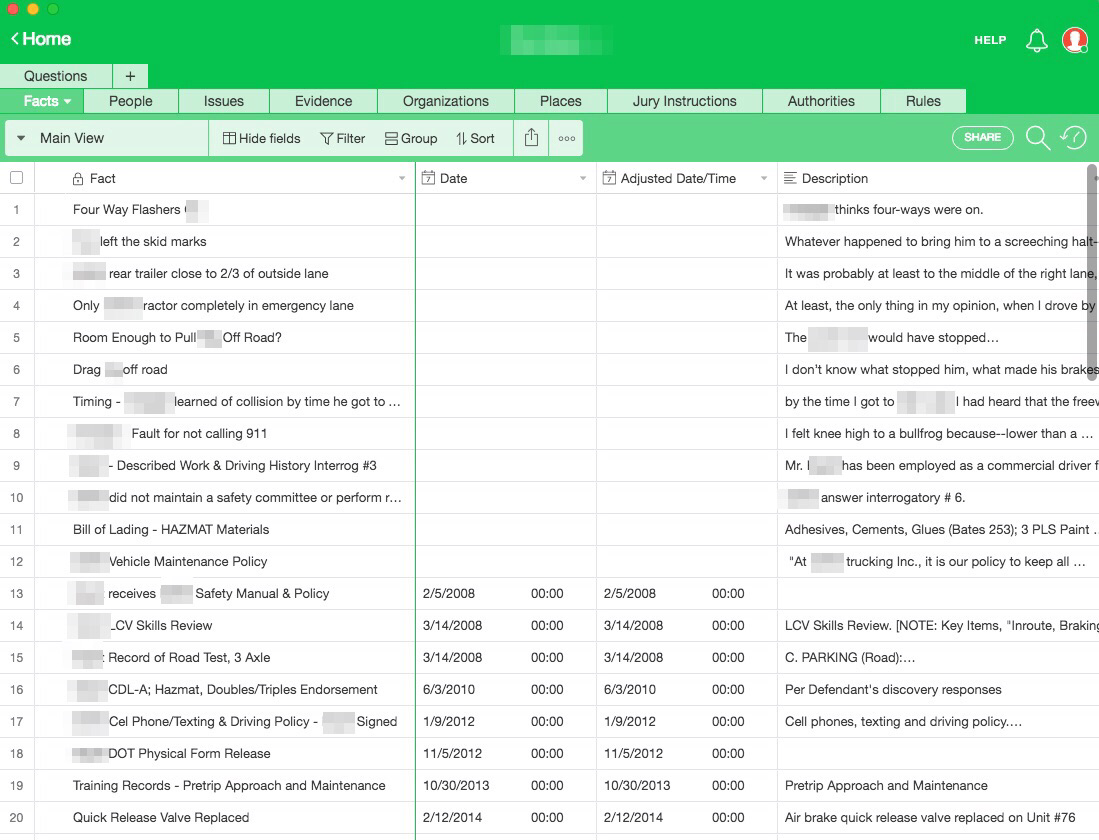
Airtable can do everything that FactBox or Casefleet can do, and more. Because Airtable is not locked in to a particular set-up, you get to choose what is what and where it goes. Want to create a chronological Fact sheet with links to sheets for Jury Instructions, Issues, People and Sources? You design it to fit your needs and never find yourself trying to pound nails with a screwdriver.

screenshot_03

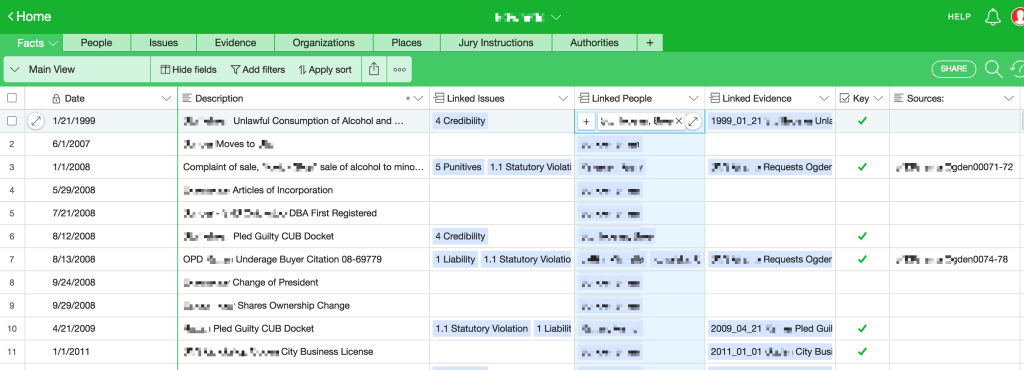
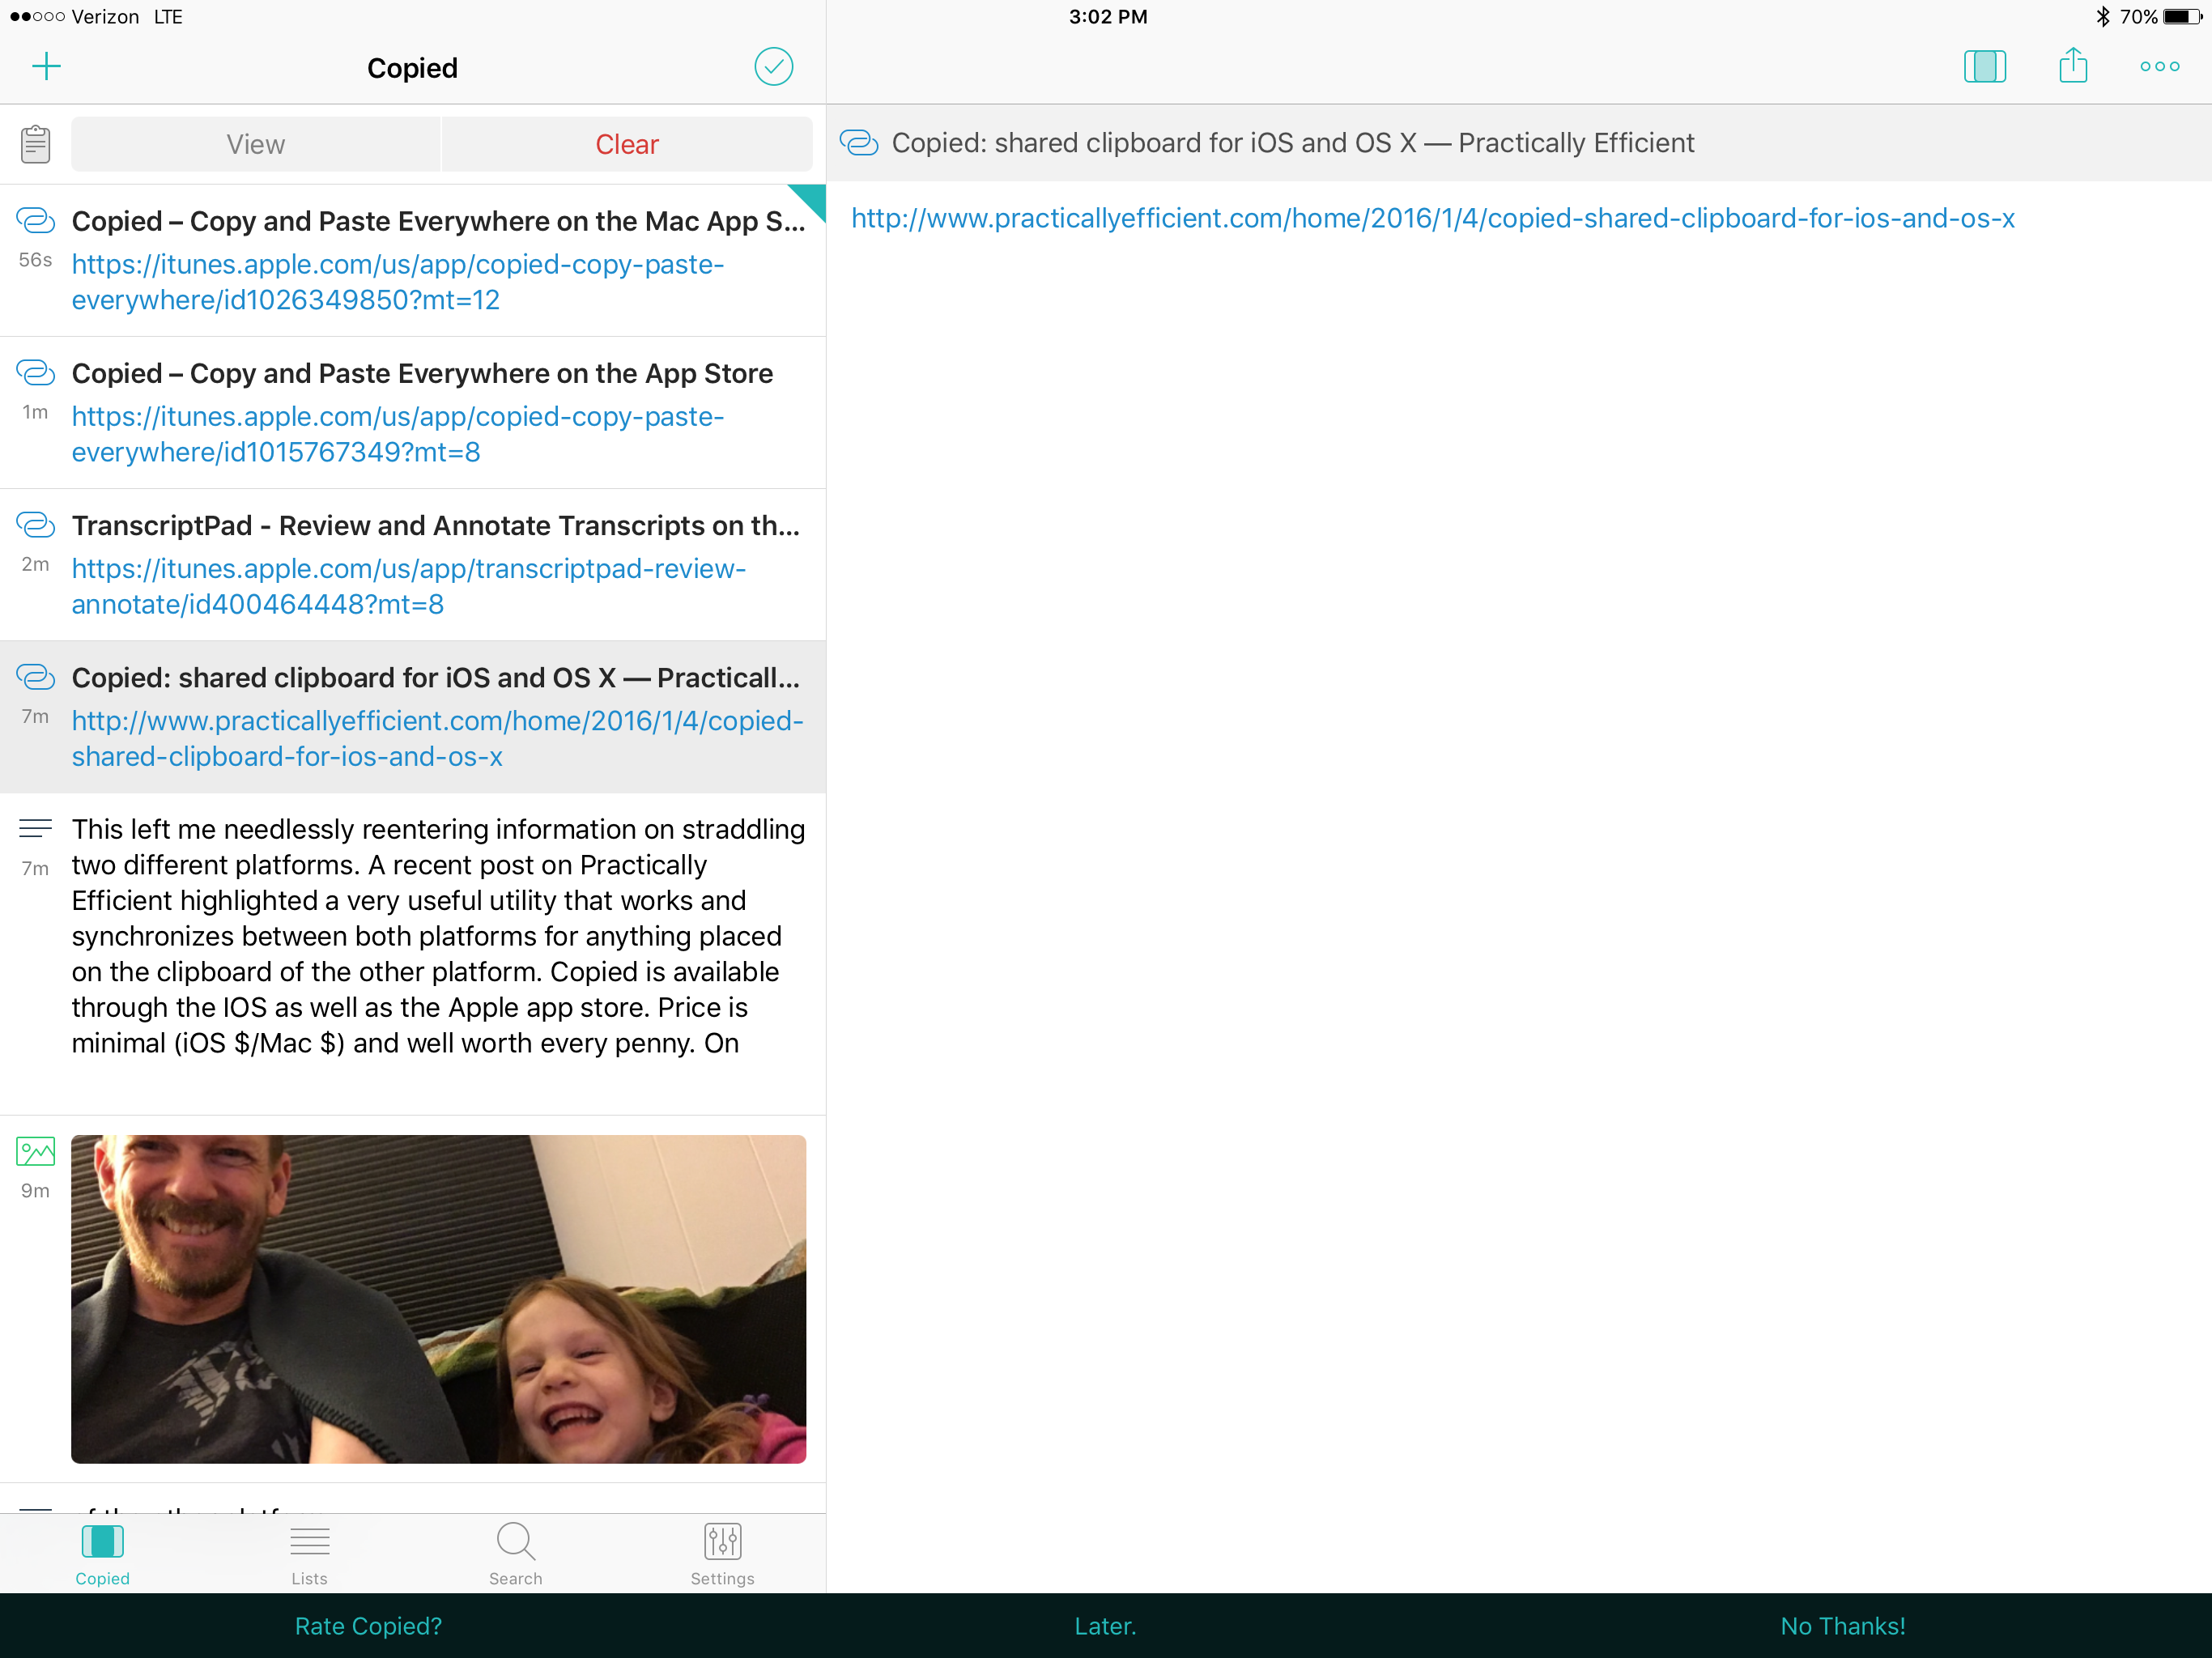
Further Airtable is free to use with some limitations that most lawyers will never run up against, but even if you find yourself pushing the limits, pricing starts at $12/month. Airtable, unlike Casemap which is captive on a desktop, is great at collaboration with other people. Finally, Airtable has a really smooth and polished iOS app that allows you to review, edit, add and update your spreadsheet/data tables from an iPad or iPhone. And, surprise surprise, the native app even offers split view if you’re using an iPad Pro.

The only downside is that, because it is a cloud based service, there must be an active internet connection in order to use Airtable. Otherwise, Airtable is an all-around win for lawyers trying to corral a large set of facts, witnesses and issues in a meaningful way.

Outline App Offers Import Utility for Circus Ponies Notebooks

A rather nice little app called Outline is going to release an import utility for Circus Ponies Notebooks. Outline runs on Mac and iPads and, here’s the really nice part, works with Microsoft OneNote. Outline originated as an iOS app that could read-write to Microsoft OneNote. Originally, OneNote was not available on the iPad and this developer put together Outline as a solution for accessing, reading and editing OneNote files. The interface is better and more flexible in some ways than OneNote. Another benefit of Outline over OneNote is the built-in ability to create a hyperlinked hierarchical Table of Contents to all notebook sections and pages.Screen Shot 2016-05-27 at 12.46.59 PM

Finally, Outline offers a very smooth export to PDF where OneNote just seems to make this task difficult.

Of course, Outline also works as a standalone app without using OneNote or Microsoft OneDrive and can sync via Dropbox, iCloud and Box. So, rejoice Notebook users, there is now an opportunity to breathe some life into your beloved notes. Although Outline is not free like OneNote, right now they’re offering a 30% discount for former Circus Ponies Notebook users. This is a great example of an indie developer seeing an opportunity and making the most of it. The importer is currently in beta testing and limited to sign up, but should be released soon.

Copied – Cross Platform Clipboard

Copy On Your iPad, Paste On Your Mac

TranscriptPad (iOS only) is by far and away my favorite method of digesting depositions and other transcribed testimony. But, the heavy lifting often gets done on the Mac side.

This left me needlessly reentering information, essentially straddling two different platforms. A recent post on Practically Efficient highlighted a very useful utility that works and synchronizes between both platforms for anything placed on the clipboard of the other platform. Copied is available through the IOS as well as the Apple app store. Price is minimal (iOS $1.99 upgrade/Mac $7.99) and well worth every penny. Once installed, anything placed on the clipboard of your iOS device synchronizes via iCloud and becomes Copied Clipboard Manager and Sync iOSimmediately available on any Mac running the software. Additionally, it works the other direction equally well. The utility also incorporates a clipboard manager that stores frequently used snippets of text and any other items that can be copied to the clipboard such as image files and URLs. On the iPad side, Copied includes utilities to transform text, e.g. convert text to upper/lower/title case; remove extra white space; and, find and replace. The ability to quickly format chunks of text on the iPad is particularly useful.

Circus Ponies Notebook May Be Dying

Quirky But Solid Notetaking App Becoming Abandonware

For years this app has helped many attorneys prepare trial and litigation notebooks. This has been my goto app for trial notebooks mainly because of it’s tabbed interface and ability to print a hardcopy paper version of a trial notebook with chapter style pagination. The app adopted a notebook metaphor with formatting for each page and divider page employing an outline format. Additionally, the app could sort these outlines by a number of different features, including alpha-numerical, date created, modified and other meta-data. In short, I’ve been a big fan and user of this app over the years (here, here, here).

But, over the last year activity level at Circus Ponies dropped significantly with fewer and fewer updates (much like this blog #sarcasm). More recently, the website is completely down as of today. Recent twitter posts (here, here) have also begun to question the continuing viability of this really useful bit of kit. UPDATE: A quick check on the iOS App Store and the Mac App Store show that the Circus Ponies software pages are gone. It’s really a shame. About 6 months ago I began to get the feeling that this app was on it’s way out. To date, I have not found a solid replacement for it. OneNote, Evernote, OmniFocus’ OmniOutliner all come close but, ultimately, fall short. There is one potential replacement that is being regularly updated and, I’m told, is currently working a beta for a completely retooled application. I’ll hold off on saying what that app is until I get a chance to test drive the new version. Suffice to say that it is a significant paradigm shift.

UPDATE 2: A user over at the MILO Group received a response from Circus Ponies regarding Notebook as a continuing piece of software. The response was apparently delayed because Circus Ponies is no longer monitoring their support email address. They confirm that Notebook for the iPad is dead and that Notebook itself is “mature,” “stable,” and will only receive “incremental changes” in the future. So, if you can read between the lines, better start migrating anything important before an OS update breaks the Mac version and there is a long delay before an incremental update gets released. Given the the death of the iPad version and dicey future support, moving forward to a different app is advisable.

On a separate note, this is the first post in a loooooooong time. A combination of joining a new law firm and personal life have slowed down my blogging. That should change from hereon out and I hope to bring back some more long-form in-depth articles, reviews and tips and tricks.

Continuity – Avoid In Court Embarrassment

With the new release of iOS 8 and the Continuity feature, you can now answer phone calls to your iPhone on your iPad (and soon on your Mac too). This really great feature can come in handy when your phone is buried in your bag or on a charger in another room. It’s also handy at making phone calls direct from your iPad or Mac as you can dial directly from a Contact without grabbing your phone. But, as pointed by iPhone JD Jeff Richardson, this can lead to some embarrassment when you turn your iPhone to vibrate, but then your iPad starts ringing in court. Jeff provides the nitty gritty on how to drill down into settings and turn off the feature that allows you to answer iPhone calls on your iPad. But, there is a far simpler solution. Before walking into court, just tell Siri to “Turn on Do Not Disturb.” Any phone calls will go straight to voice mail and will not ring through to your other devices (MacBook or iPad). The added benefit to this is that your phone will not do that annoying vibrate while you are in the middle of trying to respond to a hearsay objection or important question from a judge. And, the vibration on the new iPhone is loud enough that even in a brief case in a quiet courtroom it can be distracting.

Siri Do Not Disturb


Reduce PDF for Court E-filings

Compressing or reducing PDF  document file size for e-filing with a court

E-filing documents saves a tremendous amount of time. But, getting file sizes right can be a huge headache. Our local e-filing (Utah) limits file size to about 7mb. Our local federal district court limits PDF file size to 10mb. Often times, a file that seems too large to upload as a single document can be compressed or reduced in size. PDF files now come from a variety of sources (clients, opposing counsel, online). We have no control over the settings when creating the original document. Cleaning up the pdf can often reduce the file size and allow filing without splitting up the document into multiple uploads. However, if you think you can compress a 452 page exhibit down to 10mb, you’re probably dreaming. File size remains a function of the analog document. Keep in mind that reducing below 150 dpi using any of these procedures may make small text virtually unreadable and may also effect the ability to convert to usable OCR.

Option #1 – Print and rescan the entire document and scan ‘good’ scan settings, i.e. 150 dpi. Of course, printing and re-scanning the document eliminates many of the efficiencies associated with using electronic versions of the file and wastes a tremendous amount of paper.

Option #2 – Use built in tools for Acrobat, Preview or PDF PenPro. In Preview, select file > export, then choose ‘Quartz Filter’ and ‘Reduce File Size’ from the drop down menus. Using Preview, you’re likely to get a reduction that makes small text difficult to read. PDF PenPro uses the same ‘filter’ as Preview, so you’re not going to get much mileage there. Acrobat has some very powerful file reduction features and granular control under the file > save as (from drop down choose Adobe PDF Files, Optimized). But, if there are any oddities in the document, you can end up with errors coming from who-knows-which-page. If you keep it simple and don’t muck around too much with the settings, you can get a good result. Pro-tip: Create a ‘temp’ folder on your desktop. Copy all exhibits to that folder. Create a batch process for reducing file size and run it on all exhibits after they have been put in the temp folder. Now you can visually see which of those files, even after reduction, is not going to pass the through the e-file size restrictions.

Option #3 – Use a ‘paid-for’ utility from the app store. Right now there are three paid utilities on the Mac App Store, PDF Squeezer ($3.99)(View in Mac App Store) allows you to create your own filter settings and has built in settings which work well, but no batch procession; PDF Compress Expert ($3.99)(View in Mac App Store) a little bit clunky interface with no option to rename documents, but does allow batch processing; PDF Compressor ($29.99)(View in Mac App Store) which also allegedly allows ‘batch processing,’ but is simply too expensive to purchase for review here.

Option #4 – Roll your own or DIY. The ‘paid for’ versions are, at bottom, doing something that any user can do using Automator or AppleScript. There are at least a couple articles out there that teach you how to create your own ‘filter’ on the Mac which will then be accessible in either PDF PenPro or Preview. If you are a hacky type, go roll your own.

For now, it does not appear that there is an easy way to accomplish PDF file size reduction using an iPad.

Back to Basics – iPad eFiling

The last post identified iCab as a means for uploading, aka efiling, documents and  pleadings from your iPad. Folks have, however, struggled with some of the basics. Here’s a short picture story on how to get the job done.

1. From the app where the document resides, look for an arrow/box in the upper right corner. This is called the “Open In” button or dialog. Most apps are standardized on the iOS interface which locates it in the upper right corner. For example, with Dropbox it looks like this:

Step 1 Open Inv

2. Once you tap that open in button, scroll through your various apps until you locate iCab and tap that icon. iCab will no open and load the document you were looking at in the previous app.

Step 2 Choose iCab

3. Open a new tab in iCab and log in to your e-filing account. When you get to the button or dialog that requires you to select your pleading or document for upload, tap that button and iCab will display a list of available documents, including the document you just chose through the “Open In” dialog. Select that document and iCab should upload it to the e-filing portal. Your mileage may vary depending on the portal, but I’ve not had problems yet here in Utah.

Step 3 Login Upload

iPad: E-filing & Uploading Docs

As more and more lawyers adopt iPads, and more and more courts move to e-filing the question inevitably arises: How the ?>#!* do I upload that Motion to Kiss My Ass from my iPad?*

After researching the issue, not a lot of options exist for uploading documents from the iPad. The built in Safari web browser doesn’t support uploading to a website. PDF Expert, GoodReader and iAnnotate also lack the ability to log into an e-filing portal and upload. However, a $1.99 iPad browser called iCab does allow uploading for e-filing pleadings. I tested it with our local court e-filing here in Utah and with the Utah Federal iCab Efiling Web BrowserDistrict court ECF. It worked on both systems. As always, Your Mileage May Vary based on your particular jurisdiction and, of course, the substance and tone of your filing will neither be improved nor reduced by using iCab to e-file court documents.

* (See, Washington v. Alaimo, 934 F. Supp. 1395 (S.D. Ga. 1996)).